
I have loved fishkeeping for years, so naturally as soon as we bought our first house, the very first thing I did in the yard was to put in a pond. It started as a small, preformed liner that can be found at home improvement stores. Over the years, I added a second level to it, but it was always a hassle to maintain, and not as big as I wanted.


Several years ago, I had an excavator on site for another home improvement project. I had planned for it to take the entire weekend, but managed to complete in about 8 hours.
Early that Saturday morning as I am playing with the excavator, moving piles of dirt around like a big kid on a bigger toy, my wife came outside and said “You always wanted to have a bigger pond, right?”. Before she changed her mind, I set to work digging the biggest hole I could.
This is how my real pond journey began.


I will tell you right now, if you are thinking about building a pond, this shouldn’t serve as a guide on the best way to go about it… Instead, learn from my mistakes. As it turns out, planning is pretty important. The “dig first, ask questions later” approach cost me a lot of time, and money that could have been avoided if I had done any planning in the beginning.
When the pond was dug, I ended up with the shape that I did, because it was the biggest hole I could dig without tearing up the existing lawn, or tipping the excavator into the hole I was digging.

I had a pretty good idea of the general location that I wanted for the waterfall. The final position of the skimmer was dictated by an existing large root structure from a tree that had at one point lived where the pond now resides.
Does it work? It sure does. Is it ideal? Absolutely not.

What I failed to take into account when placing these is the natural water currents and movements that keep the water moving well through the filter. Because my skimmer is not opposite of my pond, the stepped portion of the pond is where the water naturally flows to, which means there is a certain amount of debris that will always be sent in that direction. If I were to do it again, I would spend the energy to relocate the skimmer to a better location, or I would have installed TPR’s in the sidewall to ensure water is not left in any “dead spots” in the pond. The good news is that even with the liner in place, if it ever becomes a real issue that I feel the need to deal with, there are Powerheads that can be installed to move the water where it needs to go.

Considering I started this project with a fairly extensive knowledge of fish care, but only a passing understanding of ponds, I am very happy that I did enough research to get the best bottom drain that I could find. The addition of aeration to a bottom drain is beneficial on a few different levels.
First off, aeration is important for just about everything in the pond, from the fish, to the plants, to the bacteria that supports a healthy pond ecosystem. Another huge benefit is that the currents that are created by the column of bubbles that come out of it hit the surface of the pond and spread out 360 degrees from there, which sends the water to the edges of the pond, and back down towards the drain.
So, while my skimmer placement isn’t ideal, I knocked it out of the park with the bottom drain. It’s powered by a 60L air pump, which is larger than it needs to be for the size of the diffuser included in the bottom drain, but I am running the air through a manifold which allows me to control the amount of air that comes through the diffuser. This has kept my air pump running maintenance-free for years, because rather than restricting the flow to the drain, I let out excess pressure through an open port on the manifold, which keeps the pump running with a significantly reduced load.

Once the bottom drain was in place, with the aid of my safety-minded helper, the next task was to figure out what the edges of the pond were going to look like, and even more importantly, make sure everything was level.


If I could go back and do it again, this is another part that I would plan out and execute differently, but at that point I was already way over budget. Who am I kidding? I didn’t start out with a budget, and certainly didn’t realize that this hole in the ground was one that I was going to be throwing money into until it was completed.
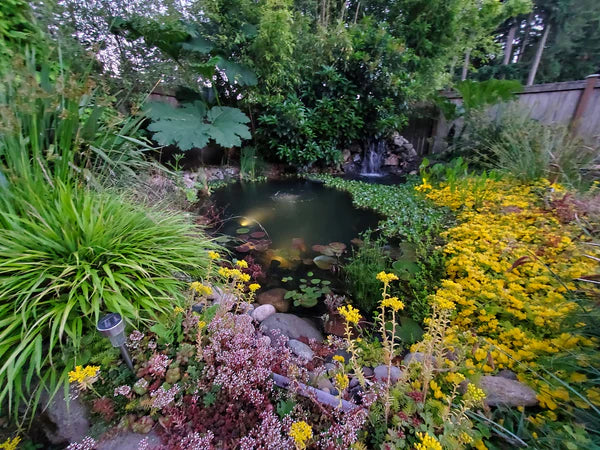
I opted to go with a natural stone edge, with a shallow area around the perimeter where I could grow marginal plants. The idea was to make it look as much like a natural pond as possible, imitating local waterways. As an added bonus to this plan, local quarries sell local stones for much cheaper than stones imported from elsewhere in the world. All of the largest stones that came out of the hole when it was dug were saved to be used in the landscaping and edging around the pond.
Once the edges were pretty well leveled, it was time to begin the construction of the waterfall. For this I used retaining wall blocks, and held it together with construction adhesive and expanding foam.

Now that I had the edges of the pond leveled out, and a rough idea of what the edges would look like, as well as how I would hide the liner, it was time to put in the underlayment. I had almost enough to cover the bottom of the pond, and in the places that I didn’t have enough, I improvised. Old BBQ cover? Sure, cut it up and toss it in there. Popped pool float? Sure, why not? Giant bag used to transport tons of gravel? Sounds good to me. At this point, I was less concerned about doing it perfectly than I was about getting it done. Did I mention that two years have now passed since I broke ground? Another reminder that planning is important.

With the underlayment, and underlayment-substitutes in place, it was time to get the liner in the pond. This would have been much easier with an extra set of hands. The only nerve-wracking part was making sure I got the bottom drain connected properly. The instructions are simple, and I should know, because I probably read them 45 times before finally cutting a hole in the liner to install it. It’s the one part of the pond that you really don’t want to fail. Once the bottom drain was connected, I was a pro at cutting the liner, and attaching the skimmer was a breeze.


The plumbing is mostly not pictured, but runs around the fence line to the concrete pad in the back, where the pumps sit, and send the water back to the spillway. I didn’t set up a filter on it at first, which I regret because it only became more difficult later on, but the lack of a proper budget didn't allow for it initially.
VICTORY!

The pond is now full of water. The water is staying in the pond. The waterfall is working.
It sure would have been easier to do the rockwork surrounding the waterfall before I filled it up with water, but hey, it was summer and the weather was nice, so it could have been worse.

The aesthetic improvements really took off from here. Added in more rocks to continue to cover up the liner, and began adding plants.


Over the coming years, the plants that didn’t survive from season to season were replaced with new ones that are more suitable to the soil and zone that I am in. This is the one part of the pond that really continues to evolve over time. It's also one of my favorite things about this hobby; watching the progression and evolution of the environment season to season, and year to year.

Now, rather than selecting plants just for aesthetics, I am selecting them to draw in different types of wildlife. In the spring time there are hundreds of frogs that make their home in the pond, and in the summer time I have dozens of different species of dragonflies that come to it.


I keep different types of floating plants in the pond every year, all to help keep the water chemistry in balance, out-compete algae, and provide cover for the fish.

in it's beautiful red form:


Over the months and years, I have continued to add upgrades to the pond. I started with upgraded lighting and a paired remote control which could dim them, then moved on to adding UV into the system to keep the water from turning green.
Most recently I've added on an AlphaONE filter to keep the water clean and clear, and it's my favorite addition yet! Installing this amongst the bamboo that has continued to grow over the years presented it's own challenges, but I was able to make it work.

What I didn’t know when I started, was the HUGE amount that I didn’t know. In building a pond, there are so many different sciences that come into play, chemistry, biology, zoology, botany, medicine, fluid dynamics, electrical engineering, and the list goes on. It’s a passion and a hobby that always has something new to offer, and will continue to bring me joy as I continue to learn along the way. And now, I have the opportunity to help others by sharing from what I've learned by doing it all the hardest way possible.
Although it was a big challenge and it's easy to get lost in the work of the project, it's completely rewarding to be able to enjoy the little slice of zen that I created in my backyard, and watch it continue to evolve over time.
The best part about my experience in learning all of this is that now I can help others avoid making the same mistakes that I did, now that I am working here at Play It Koi. If you have questions or need any help with setting up a new pond, or maintaining a pond that you already have, I'm only a phone call away. Feel free to reach out to me at 206-350-7580 or send me an email at Derek@PlayItKoi.com.


3 comments
Pond Liner
I’m building a small pond too, and the only change I’m going to make vs. yours is the pond sealer, I’d recommend Pond Pro 2000. It’s a butyl liquid rubber sealer that never needs a primer. It’s-resistant, puncture-resistant, and non-toxic so it’s safe for fish, plants, and other aquatic life within the pond. It’s available in black and white colors and quarts and gallons. Its coverage on a smooth surface is 50 sq. ft. per gallon. Avoid rain the first three hours of application. Any leftover material can be stored for up to 2 years.
Scott
I would venture to guess your excitement to build your pond. Is very similar as too many of us as I know I too reacted before the plan was finalized.
You had me chuckling several times as I did almost word for word several times.
The wife started the conversation after I had just remodeled our patio. Say how about building a little water feature " fountain" so as I started looking on line I found aquascapes video Worlds Most Beautiful Backyards. It might as well have been on a fishing hook it was set and set deep.
The day after x mass I had an excavator delivered to see if I had any depth to the area as we have ledge protruding.
Well digging an excavation the day after x mass in New England is not a brillent move.
No liner fabric or rocks had been purchased. Mother nature decided to show how bad poor planning can be. Even though my only goal was to find out how deep I could get. 8 feet latter the wheels are spinning full speed ahead.
Below is a link to my build . I’m not selling anything it’s just amazing how similar many aspects are for the other side of the country
https://www.gardenpondforum.com/showcase/12-000-gallon-koi-pond-full-build.141/
Carlos Cruve
I want to learn to do a pound